Reporter tutorial: intermediate
The following tutorial builds off of the Basic Reporter Tutorial, and takes you a little further down the road of using the Reporter to its fullest potential. As with the other Reporter tutorials, you can work through each lesson in their entirety or select individual lessons for more specific content.
 Data Relationships in Reports
It is helpful to understand the data relationships that make up reports, and how these relationships affect your report presentation and the options that are available to you.
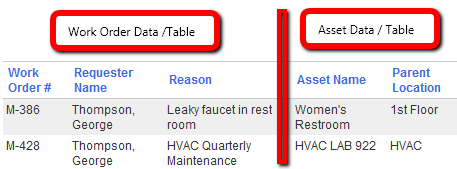
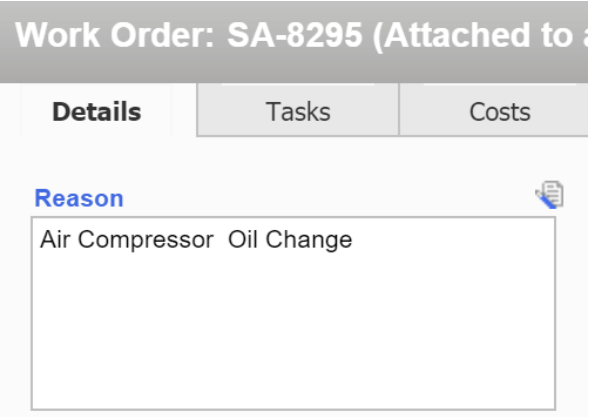
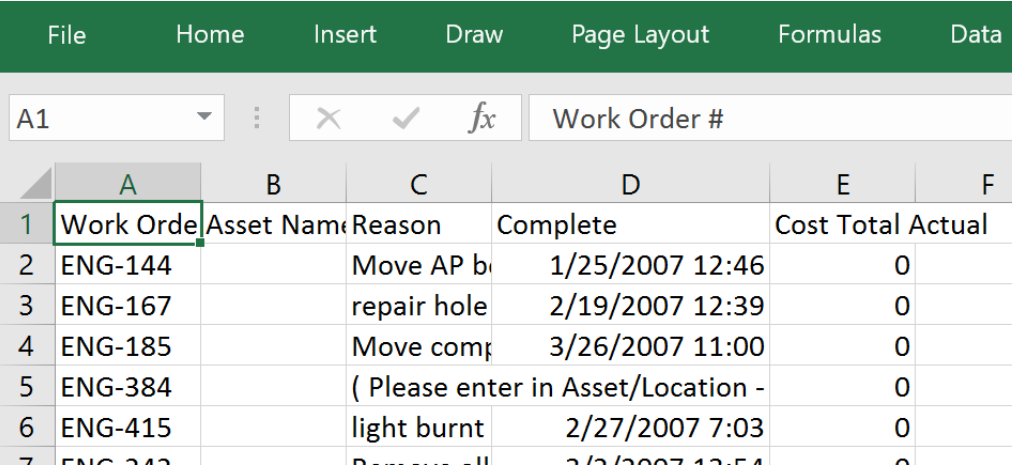
Each module (or Report Group) includes a set of basic reports defined with a simple, one-to-one relationship between available data files. For example, the many Work Order Lists found in the Work Order Report Groups are simple reports with data available from the work order table and each work order's associated asset. The relationship between the primary table (work order) and secondary table (asset) is one-to-one in the below example as there is only one primary asset record associated with each work order (the asset defined on the Work Order Details tab). As such, it is very easy to report on asset and work order information together on the same row/record of the report:
The more complex reports in each Report Group have one-to-many relationships between available data files. As an example, Work Order Labor reports are available that list the actual labor hours (and/or costs) associated with each work order. In this situation, there can be many actual labor records tied to the same work order. For example, let's look at a work order to clean up graffiti found at a park that required two individuals to "finish" the job (one to clean up and one to repaint a couple weeks later). In this situation, if we place the work order and work order labor information on the same level in the report, the work order information is duplicated, as it is the same work order referenced for each actual labor record:

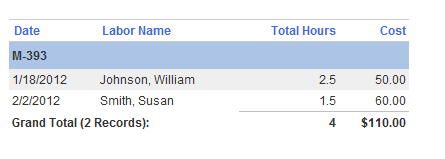
If we want the information to be presented more hierarchically to avoid this duplication, one-to-many reports like this often include sorting/grouping defined on the primary record. That is, we can define the work order (WO#) as the first level of sort and group at this level. This avoids duplication of information that is common to all records in the group, and creates a nice summary calculation of data displayed:
There are several examples of data maintained in Maintenance Connection that involve these more complex data relationships. One excellent example is the one-to-many relationship when reporting against multiple assets linked to a work order through the Tasks tab. Additionally, there can be many training/certification records for a given labor resource (staff member), or many asset downtime records for a given asset. When reporting against this type of data, be sure to plan for the appropriate level of grouping and/or total calculations to ensure that your information will be presented as desired.
Create Tutorial Training Report
Use the following steps to create a report that we can use as our example report throughout the tutorial:
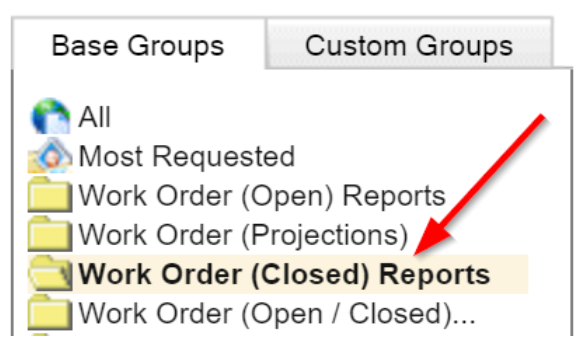
- Select the Work Order (Closed) Reports folder on the left:
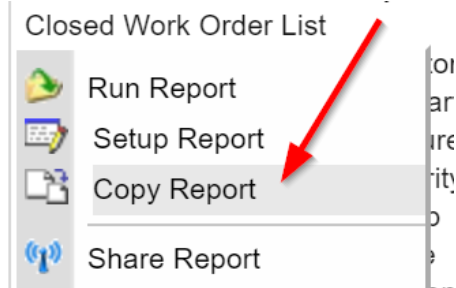
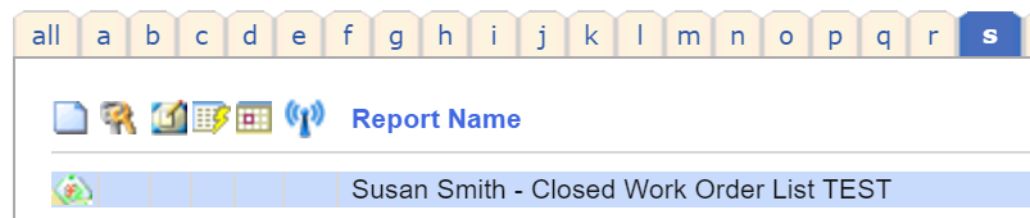
- The Report List on the right will display all reports currently in the selected Work Order (Closed) Reports group/folder. Locate the Closed Work Order List and select it (you can search for "%list" to quickly locate it). Once it has been selected, click Copy Report (alternatively, you can right click on the report name and select Copy Report):
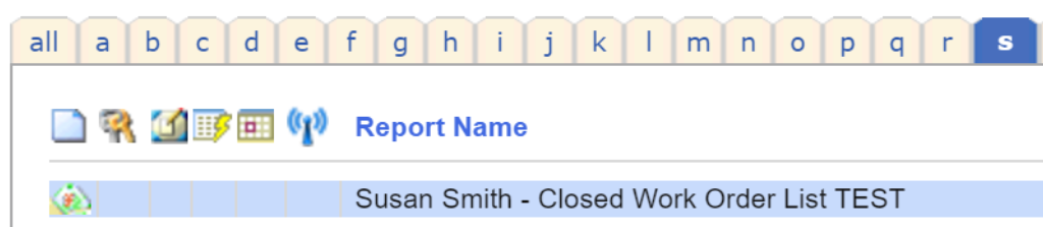
- The report will open in the Report Copy window, showing standard options for Report Setup. At the top of the window, enter a name for your report, such as "Your Name - Closed Work Order List -TEST." It is helpful to put the word TEST in reports used for training, so that they are easily identified later:

- Specify a Repair Center in the Managed By prompt if the report should only be viewable by a particular Repair Center. To make the report viewable by all, select All Repair Centers. The logged in user's Repair Center will be shown by default.
- Click on the Groups tab, and then the Custom Groups sub-tab. Ensure that this report is designated for inclusion in your desired Report Group. This makes it easier to locate the report in the future:

- Click Apply when you are finished and you will return to the Report Lookup. The new report is likely to display by default, depending on what it was named and the "Managed By" Repair Center to which it was associated. If your new report does not display by default, modify the filters at the top or page through the Report List to locate it
Now you are ready to modify your new report as needed.
Modify Report Criteria Options
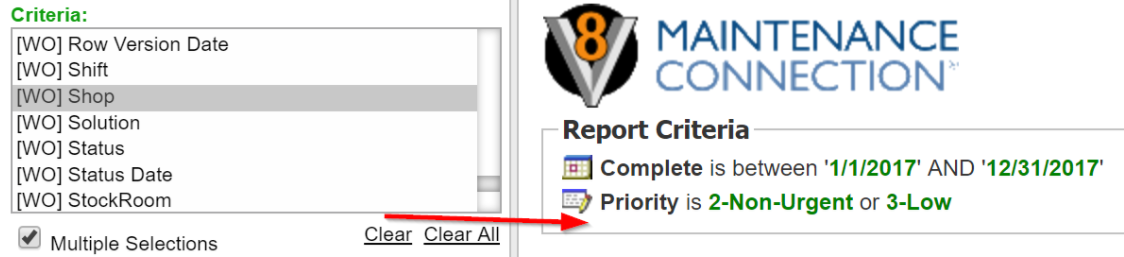
The field prompts that display in the Report Criteria dialog will vary depending on the report in use. The options available can be tailored to exclude prompts that will not be used and/or add prompts that are not shown. In the new report we just created, we will add a prompt to filter report data based on the date the work order was completed (WO.Complete). For closed Work Order reports, the Completed or Closed date is often preferred, rather than filtering by Target date.
- From the Report List, select the report that you created in Lesson 2, and then select Run Report:

- The Report Criteria dialog will open for this report. Select Apply to open the Report Preview.
- Once the Report Preview displays, select the Setup button in the toolbar:

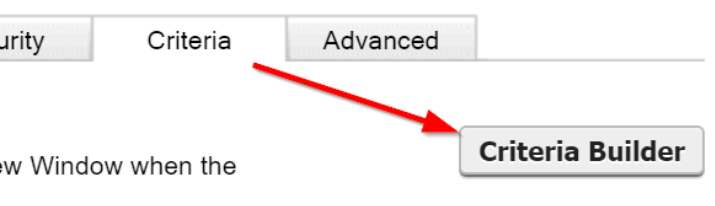
- In the Report Setup window, select the Criteria tab:

- Users with proper permission will see the Criteria Builder button within this tab. Select this button:
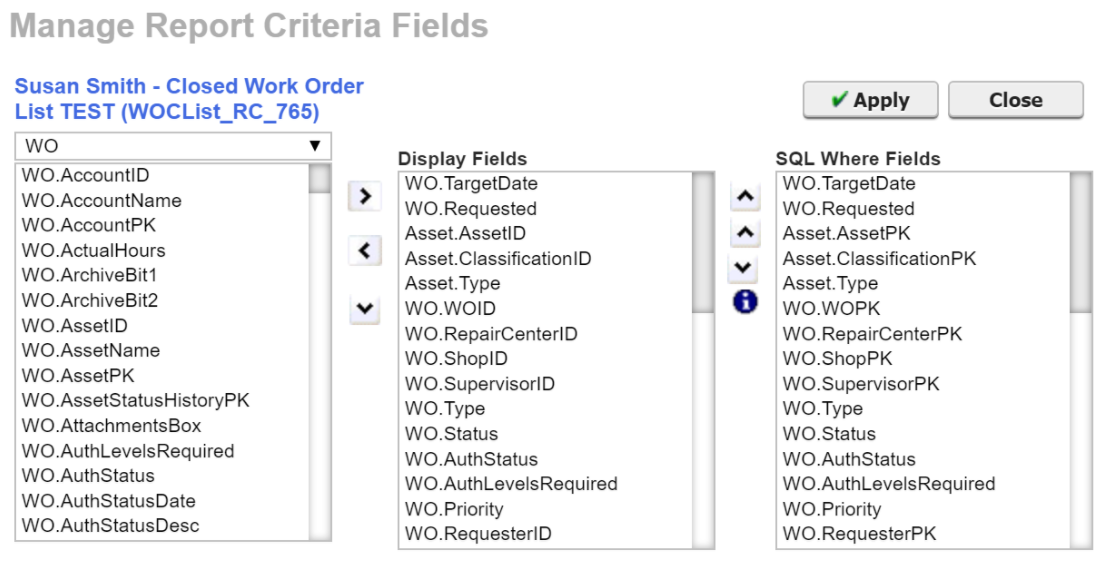
- The Manage Report Criteria Fields dialog will display:
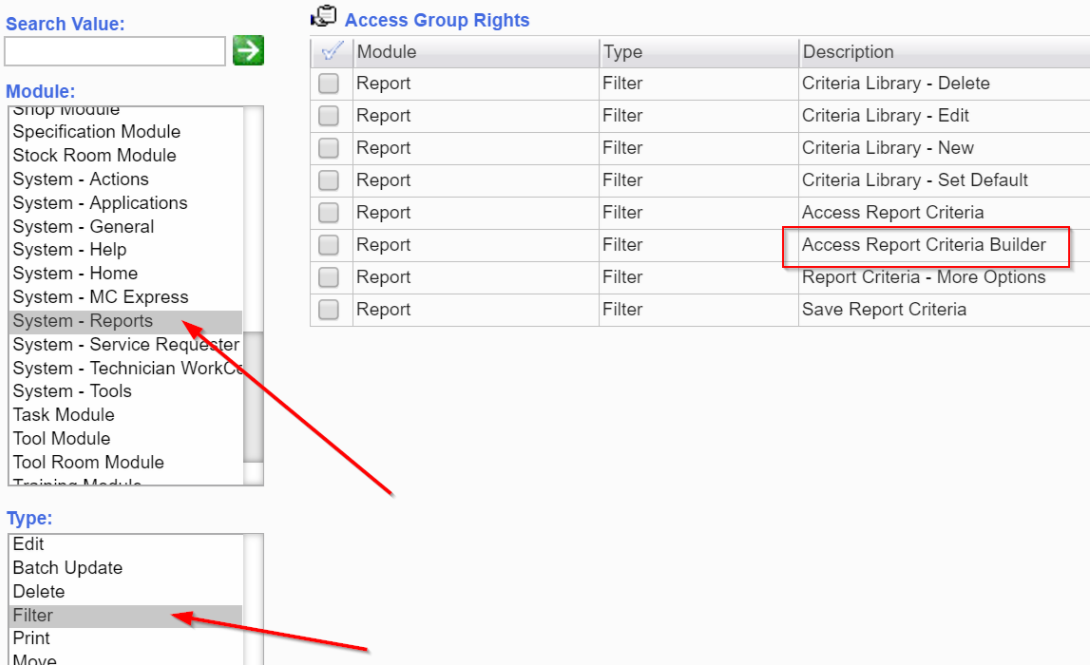
Note: To grant access rights to the Criteria Builder (Manage Report Criteria dialog), Administrators can enable the feature for the desired Access Group in the Access Groups module. The permission is located under the module System - Reporter and the category Filter:
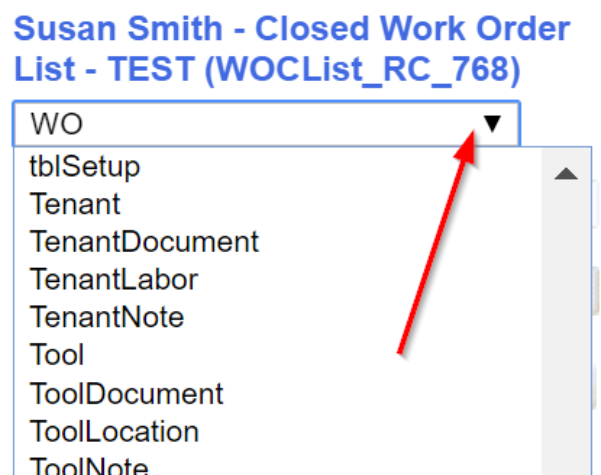
- To add the date the Work Order was completed (WO.Complete) to the criteria options, we must find it in the list. The Work Order (WO) Table will be selected by default, so you only need to scroll alphabetically until you see the WO.Complete field.
Note: To select a field from a different module table, click the dropdown arrow, and select the desired module from the list:
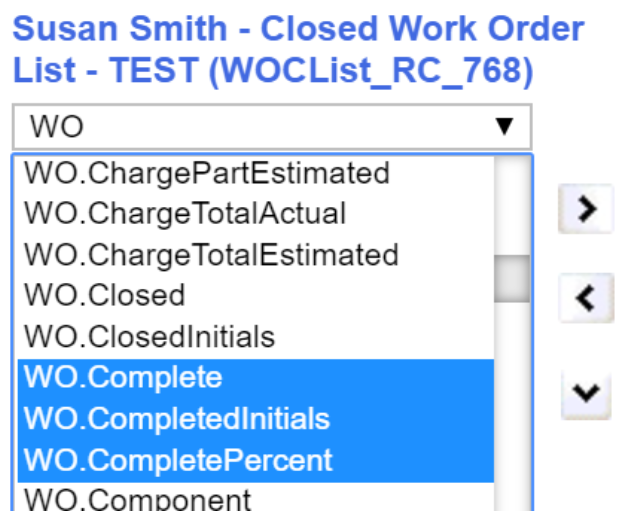
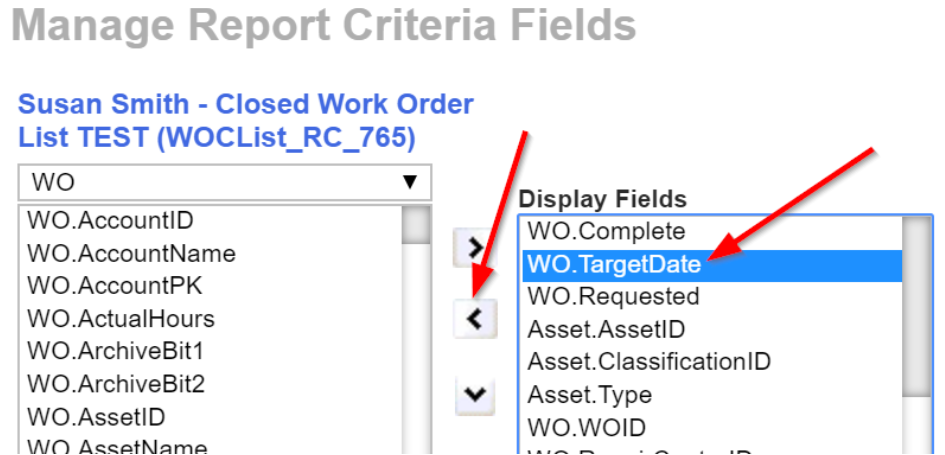
- Select WO.Complete from the list on the left and then click the right arrow adjacent to the list to move the field onto the Display Fields list in the middle of the dialog:
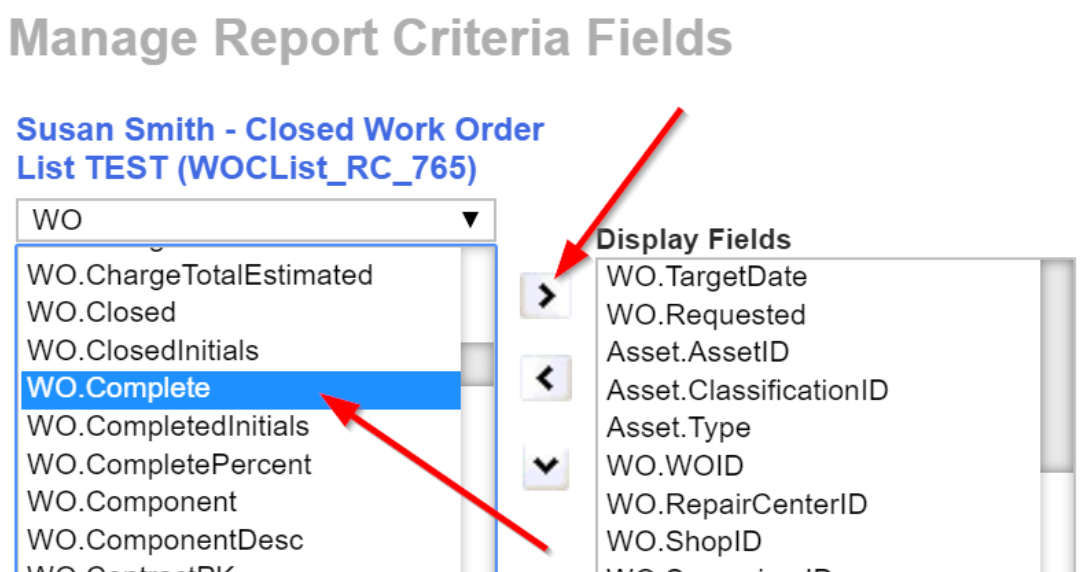
Tip: You can choose multiple, sequential fields to add/remove by holding down the Shift key and selecting the first and last fields in a sequence of fields that you wish to add/remove:
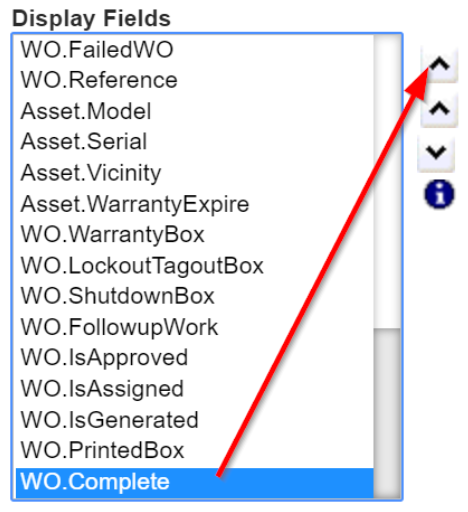
- The field will move to the bottom of the Display Fields list (as well as the SQL Where Fields list), so it may not be visible initially. To move the WO.Complete field to the top of the Display Fields list, select it within the Display Fields list and then click the higher of the two up arrows. Depending on the number of display fields, you may have to click the up arrow(s) several times before the field reaches the top of the list:
Note: To add Lookups for particular fields to the Criteria dialog, select the Primary Key (PK) for the desired field (e.g. WO.AccountPK, WO.AssetPK).
- Now let's remove the Target Date field to ensure there is no confusion between these prompts. Select the WO.TargetDate field from the Display Fields list and click the left arrow to the left of this list:
- When you have finished making these two changes, click the Apply button at the top of the dialog:

- Click Apply in the Report Setup window to save the changes and return to the Report Preview window.
- Now, select the Criteria button from the toolbar:

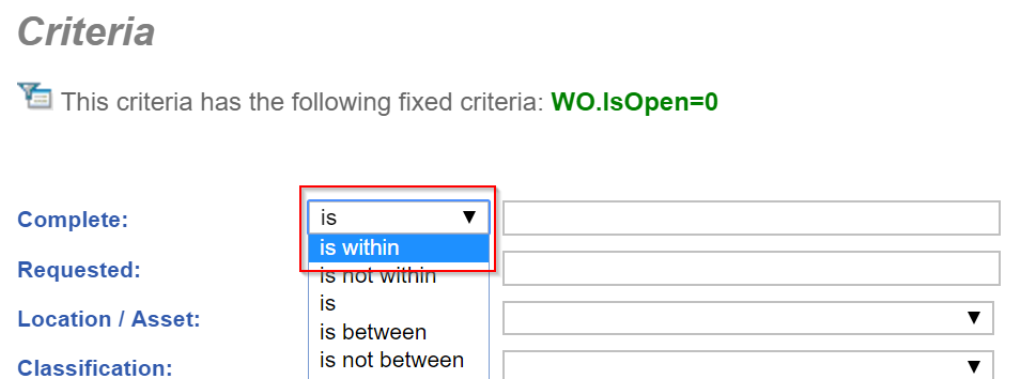
- The Report Criteria dialog will display. Complete should be listed at the top of the dialog and Target Date should no longer display. By default, added criteria fields will have their operator field set to \"is.\" In order to select predefined date range filters for the Complete field, set the operator to "is within":
- Select an option from the available dropdown that will return a record set for this tutorial:

- Click Apply to run the report, and Work Orders that have been completed within the current year to date will display.
Note: If you need to add an ID field (such as Zone ID) to Report Criteria options, submit a request to our Support team for assistance in defining the correct relationship to ensure the field option dropdown is presented correctly.
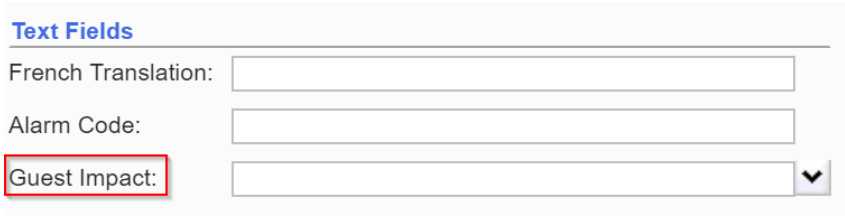
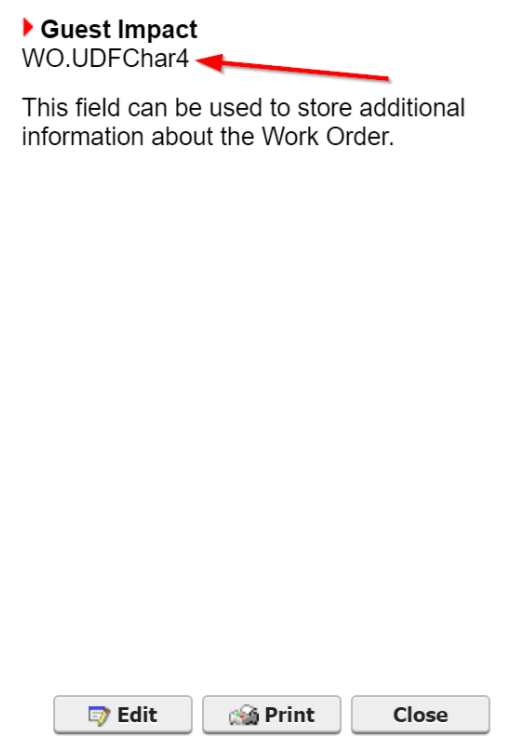
Tip: The Manage Report Criteria Fields dialog requires that you know actual table column names (rather than the user-friendly label from the data dictionary). If you do not know the actual name of a field, locate it on the WorkCenter page and click the field label (right click for an indicator/checkbox). The help popup will display, showing information on the field. The name shown in the second row is the actual column name, which is used to define custom report criteria. In the below example, WO.UDFBit3 would be listed in the Manage Report Criteria Fields dialog, even though it displays in the interface as "Guest Impact":
Lesson 4: Conditional Formatting and the Style Editor
Conditional Formatting
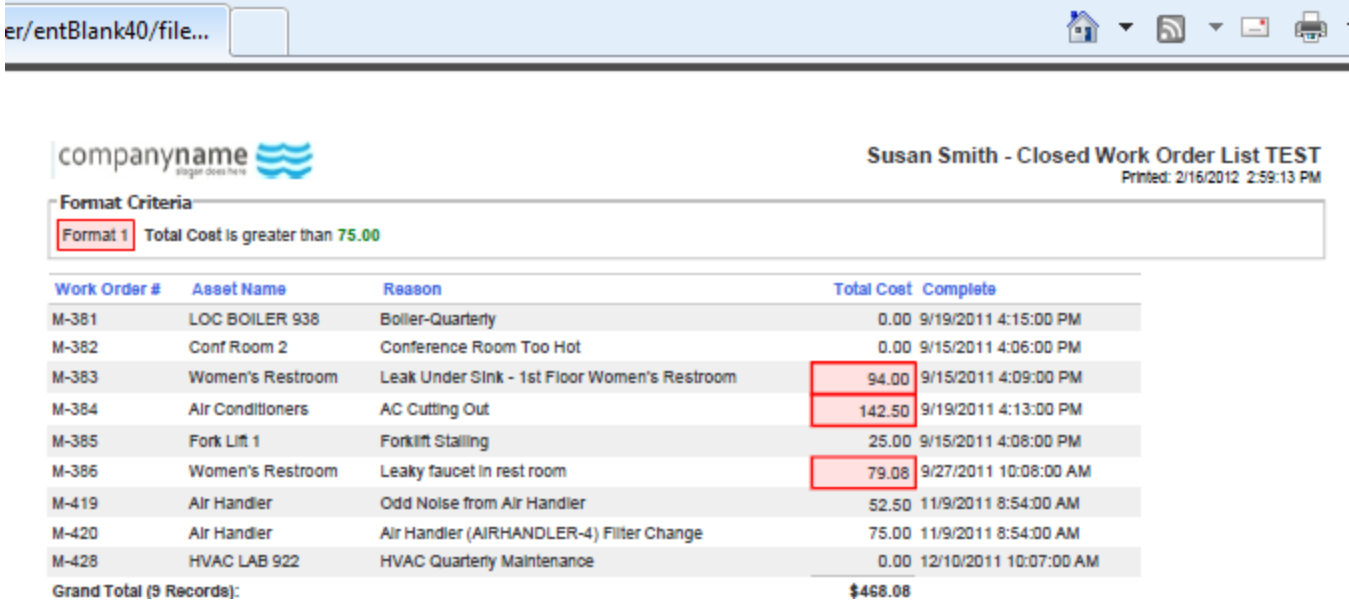
You can use conditional formatting to apply special formatting when the value in a given field meets a certain criteria. Let's modify our report to place a red border around work orders that exceed a particular dollar amount:
- If you are continuing from Lesson 3, return to Report Setup. Alternatively, access Report Setup for any Closed Work Order Report that can be modified for training purposes:

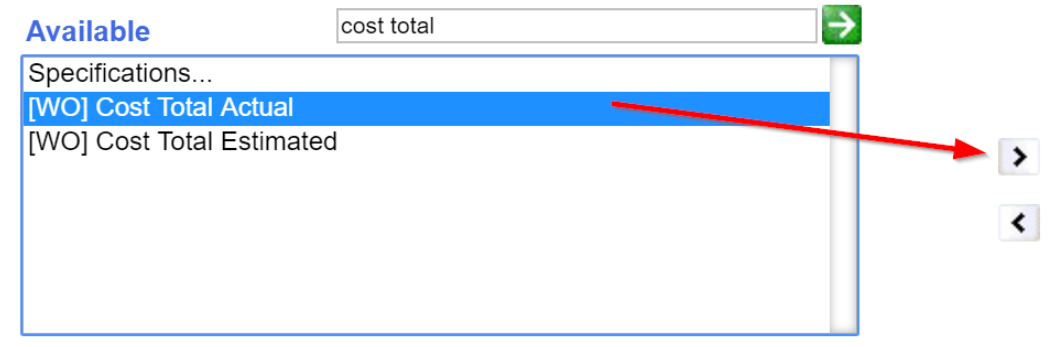
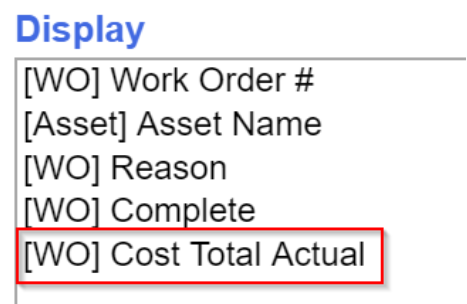
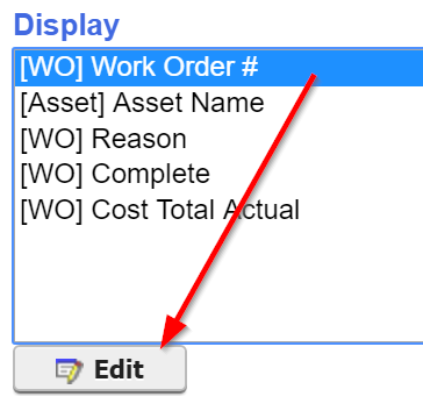
- In order to perform a calculation based on Total Cost, we need to ensure that this field is included on our report. Let's modify our field list to include the field that stores this information. This field is called [WO] Cost Total Actual. Locate (or search for) the field in the Available fields list and move it to the Display fields list:
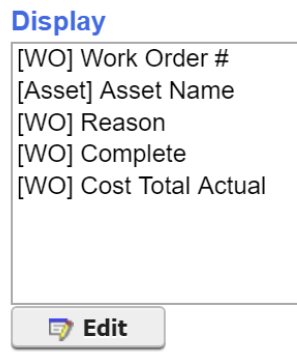
- Let's also add the Work Order Complete Date to the report, and remove extraneous fields that are not needed. Add and remove fields until your Display fields list looks similar to the following:
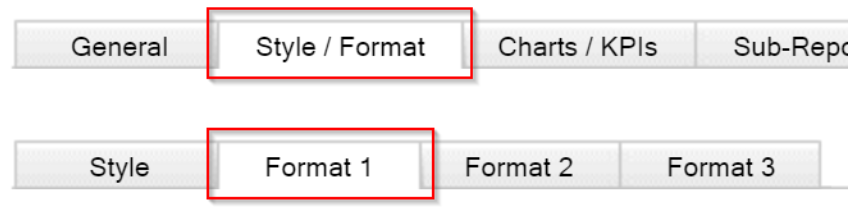
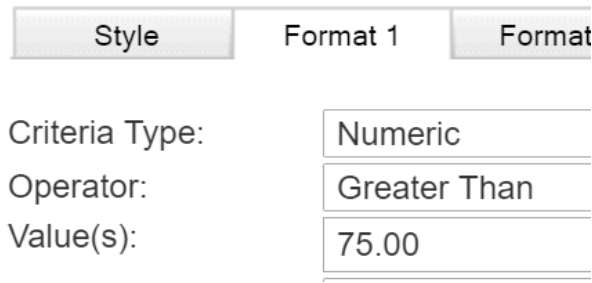
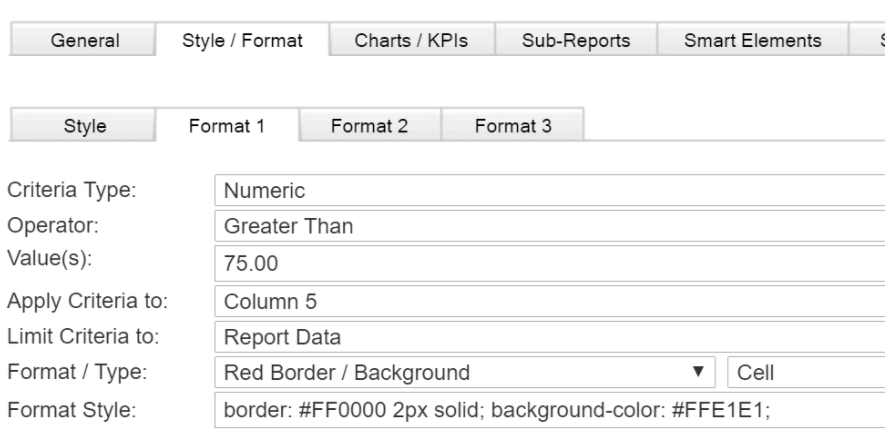
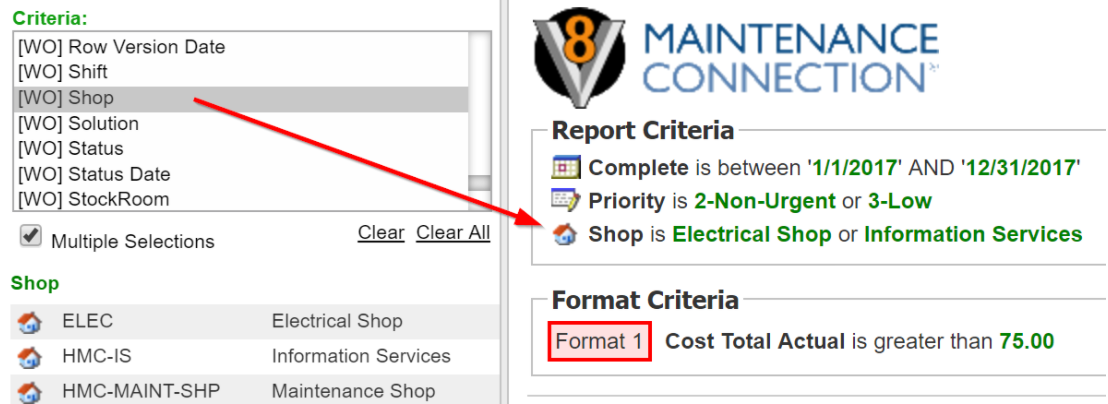
- Click on the Style/Format tab and then click on the Format 1 sub-tab. Up to 3 different conditional formatting criteria can be defined (Format 1, Format 2, and Format 3):
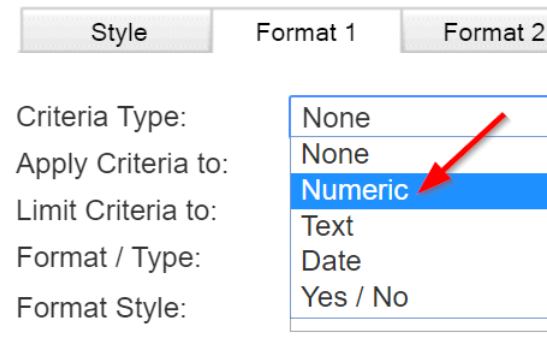
- In the Criteria Type dropdown control, select Numeric, indicating that the criteria will be based on a numeric value:
- An Operator field will appear to specify the operator for your expression. Since we wish to highlight all work orders with a cost greater than a particular amount, we will use the operator Greater Than.
- A Value field prompt will also display. Enter an appropriate number for your organization. For example, you could enter "75.00" in the field prompt:
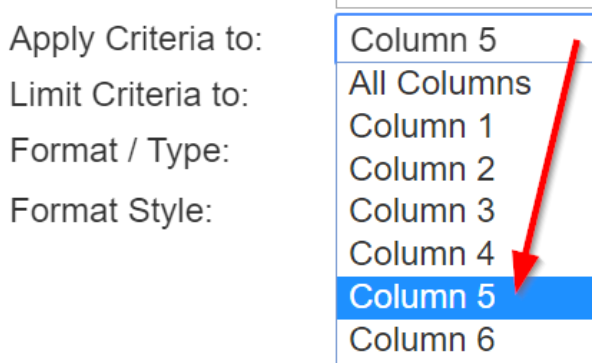
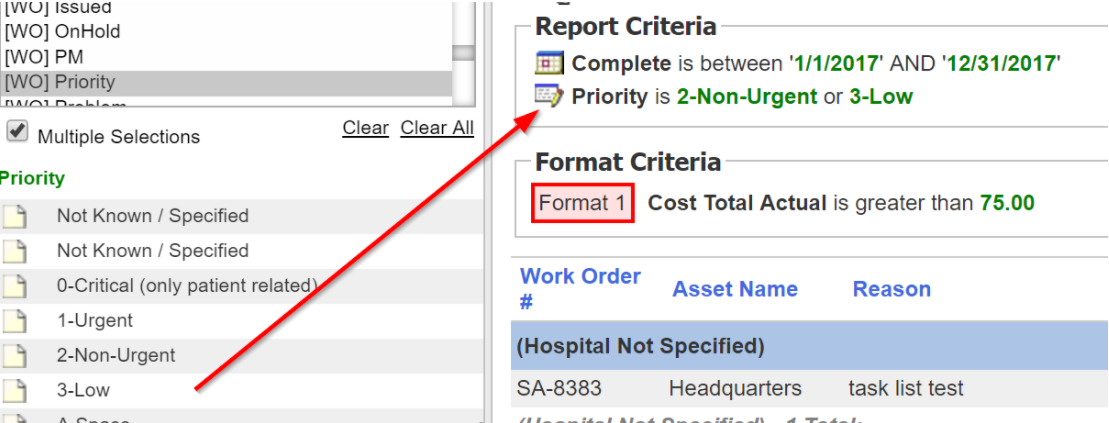
- In the Apply Criteria to prompt, you must indicate the column in your report on which the calculation should be based. Looking at the Display fields list, the Cost Total Actual field is the fourth field/column displayed, so we will select Column 5:
- In the Limit Criteria to prompt, we will leave the value Report Data. If we only wished to have this conditional formatting apply to group totals, this prompt could be used to specify this.
- The style for this conditional display can be defined using available predefined dropdown values, or by using the Style Editor. Let's use the available dropdown options first. From the Format Type field, let's select Red Border/Background to ensure the value stands out. We will set this to show in the Cell, rather than the Row. Notice how the Reporter automatically populates the HTML Style Tag based on your selection. This does not need to be altered:

- Your page should now appear similar to the following:
- Click Apply when you are finished to view your results:


The Cost Total Actual column is highlighted (and bordered) in red for all work orders with a total cost over $75.00. Also notice that the Format Criteria defined is specified above the report output so that report viewers will understand what the formatting means.
Using the Style Editor
In addition to the predefined dropdown options, the Style Editor is also available to assist in defining conditional formatting styles in reports. To use the Style Editor, return to Report Setup:

- Click on the Style/Format tab and then click on the Format 1 sub-tab.
- Note that to the right of the Format Style field there is an Edit Style icon:

- Click the Edit Style icon and the Style Editor will open, defaulted to define the Content and Text style:
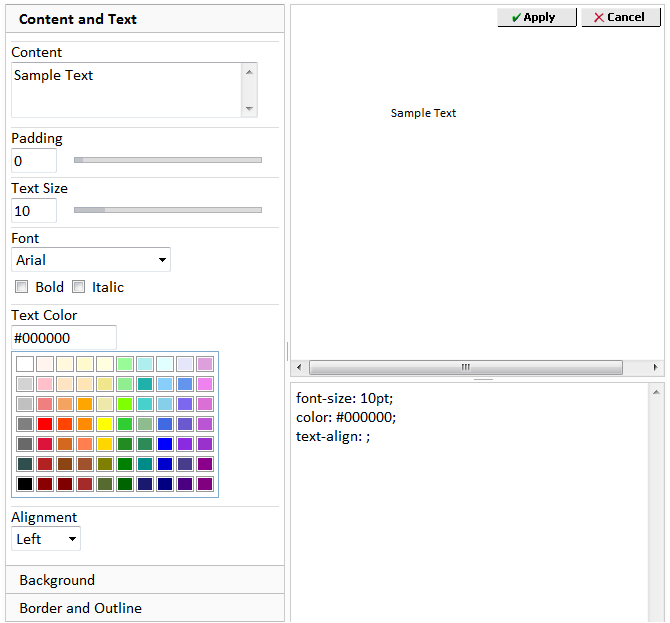
- Use the available options in the Content and Text section to set the font family, size, style, color and alignment:
- By default, the font family will be set to Arial, font size to 10 point, font color to black, and alignment to left. These settings will be applied if not otherwise set/modified.
- Text Size can be modified by entering a number into the available prompt, or by sliding the available control.
- Font color can be modified by clicking on a desired color.
- Indicators are available to set the font style to bold or italic.
- Alignment can be set as desired.
- Padding can be used to increase the space around the text.
- As modifications are made, changes to font color, size and style will be shown in the area in the upper right, and the associated HTML for the style will be shown in the lower right:

Tip: The content field can be modified if you wish to enter additional text to better see how the changes will appear.
- To modify another style parameter, click on the appropriate tab. The options displayed will change to reflect those available for the given selection. For example, selecting Border and Outline will present the following options:
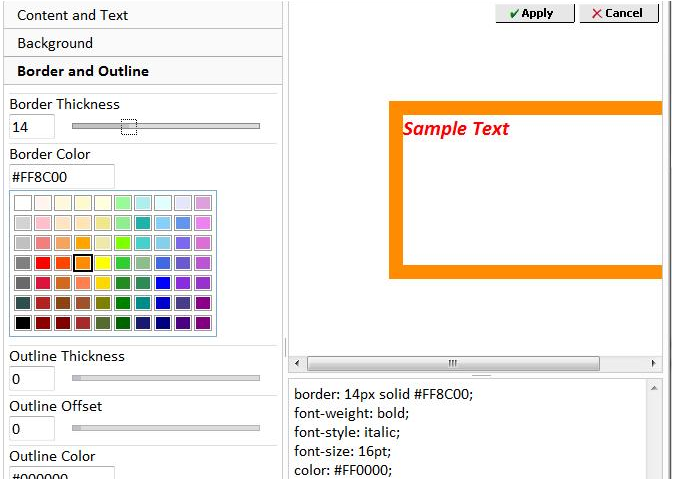
- The same process can be used to set a Background color (click the Background tab).
- When you are finished setting a style, click the Apply button in the upper right. The Style Editor will close, and you will be returned to the Report Setup window.
- To view the style you have set in the Report Preview window, click Apply.
Lesson 5: Smart Report Popups
Reports can include smart actions, which allow you to click on a row/column displayed in a report and open the respective record or a defined report. You can even use smart features to allow editing of report fields from within a report, or updates to status (e.g., Issue work orders). In this tutorial, we will demonstrate how to connect a record in a report to its associated work order.
- If you are continuing from Lesson 4, return to the Report Setup. Alternatively, access Report Setup for any Work Order Report that can be modified for training purposes:

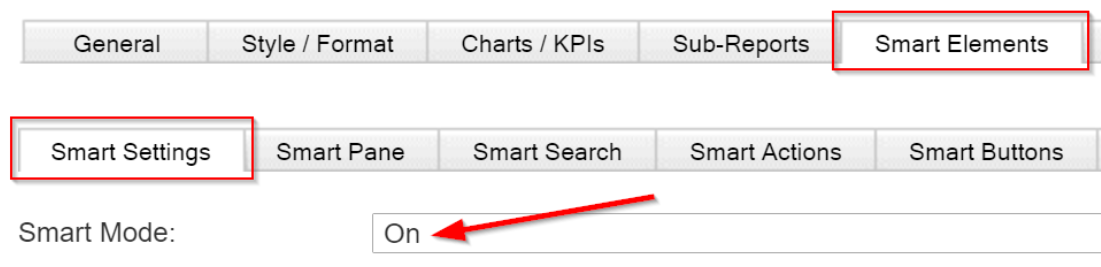
- Click on the Smart Elements tab and turn Smart Mode On from the default Smart Settings sub-tab:
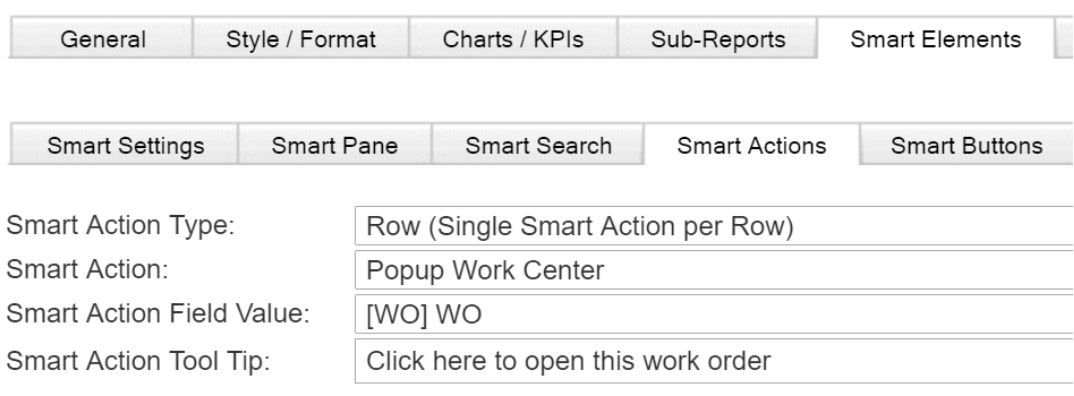
- Select the Smart Actions sub-tab. From this sub-tab, we can specify the type of smart action to enable. For Smart Action Type select Row (Single Smart Action per Row):

- Additional fields will display to define the desired action. From the Smart Action dropdown control, ensure Popup WorkCenter is displayed.
- In our example, we will allow the user viewing the report to open the work order listed. To enable this, scroll to the bottom of the Smart Action Field Value dropdown control and select [WO] WO. In the Smart Action Tool Tip field, enter "Click here to open this work order." Your page should appear as follows:
- Click Apply when you are finished to view the defined smart action in the report.
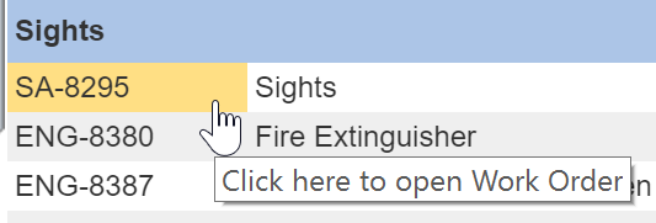
- Hold (hover) your mouse over a report row. Notice that the row is highlighted and the Tool Tip you specified displays:

- Click on a desired row. The Work Order Work Center should pop up, displaying the work order identified in the report:
- Click the Close button in the upper right corner to return to the Report Preview window.
- Select the Setup button to return to the Report Setup window, so that we can set this popup to be "column- specific."
- Return to the Smart Elements tab and select the Smart Actions sub-tab.
- Change the Smart Action Type to Column (Multiple Smart Actions per Row). The remaining prompts on this page will disappear:

- Now, a smart action can be defined for each given column. Select the [WO] Work Order # field/column in the Display fields list and click the Edit button below the list:
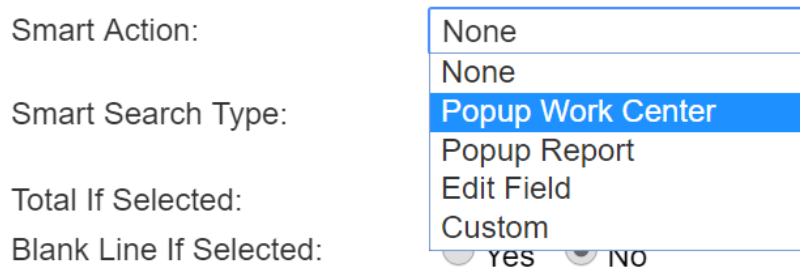
- In the the Report Field Options dialog that displays, set the Smart Action control (in the middle of the dialog) to Popup Work Center:
- Additional fields will display to specify the type of popup. Set the fields as shown below:

- Click Apply to close the Report Field Options dialog. Click Apply again to save your changes to the Report Setup and return to the Report Preview window.
- Notice how the Work Order # field is now the only field that highlights and is connected to the Work Order popup. This allows you to choose different actions for other columns in the report. For example, the Asset Name field could popup the Asset record or a defined report:
Smart Criteria and "On the Fly" Criteria
Smart Criteria is a very powerful feature that allows you to dynamically filter data presented in the Report Preview window until desired results display. Smart Criteria works as a supplement to any criteria already defined using the Report Criteria dialog. Similarly, "On the Fly" criteria also allows users to dynamically filter data from the Report Preview window.
Before explaining how to use these two features, it will be helpful to note the purpose behind each so that you can understand which feature is best suited per situation. Smart Criteria is designed for Administrators or users with appropriate permissions to adjust report criteria as a whole. On the other hand, "On the Fly" criteria offers a more controlled range of report criteria that end users and technicians can modify. For example, you might have five fields set up as report criteria, but only want end users to be able to modify the criteria on two of these fields. To accomplish this, administrators could remove report criteria access from a given Access Group, and then set up the report to list those two criteria as "On the Fly" report criteria. This not only gives greater control over report criteria, but also offers technicians the simplest method of adjusting criteria if necessary.
Smart Criteria
Let's use Smart Criteria to further filter our displayed report. The Smart Criteria option is typically "hidden" in the Report Preview window. Let's return to Report Setup to make it display by default for this report:
- If you are continuing from Lesson 5, return to Report Setup. Alternatively, access Report Setup for any Work Order Report that can be modified for training purposes:

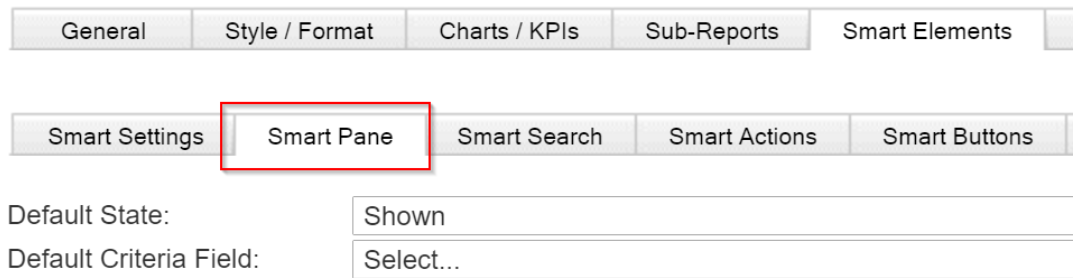
- Click on the Smart Elements tab and select the Smart Pane sub-tab.
- Change the Default State to Shown. This will ensure that the Smart Criteria Pane displays automatically each time this report is opened. The Smart Criteria Pane will also remain open as you toggle between Report Preview and Report Setup:
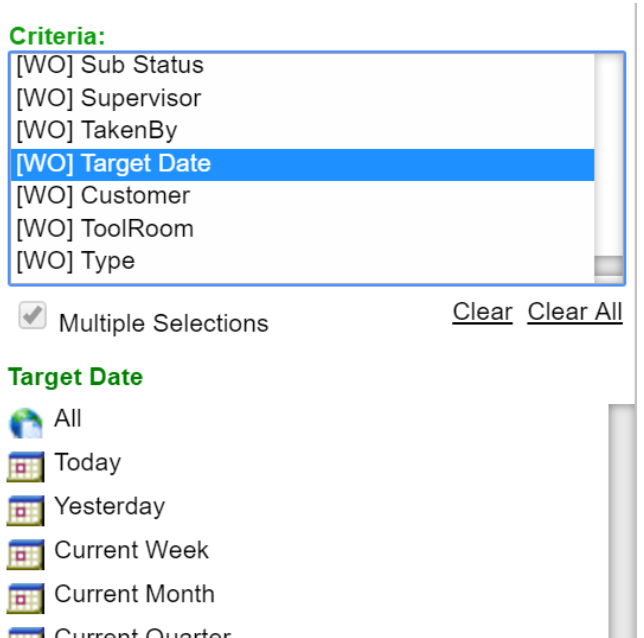
- In the Default Smart Criteria prompt, enter the first field you would like to perform the dynamic filtering against. Common choices are Shop, Type, Problem, Priority or Complete (date). For our example, let's choose [WO] Priority:
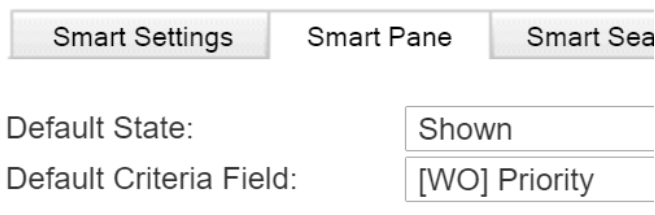
- Click the Apply button to return to the Report Preview window.
- The Report Preview window will display, split into two panes, showing the Smart Criteria pane on the left. Our default field (Priority) is selected automatically:
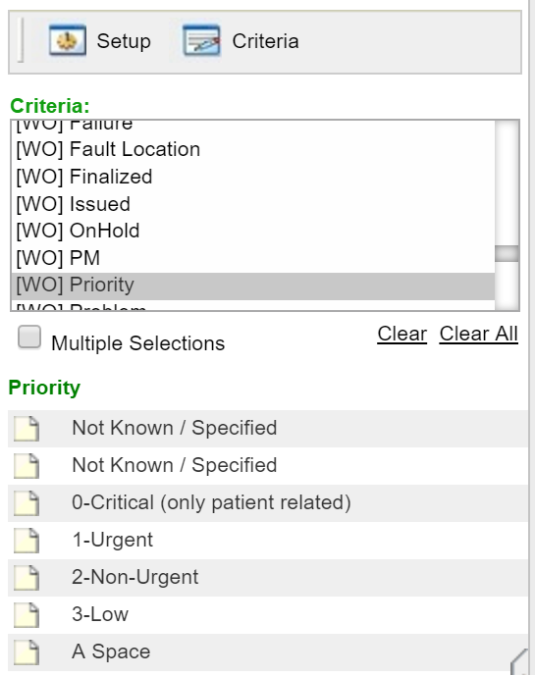
- Click on the value for Non-Urgent (your options may be different). As this option is selected, the criteria is added to the Report Criteria and the page is refreshed with your newly filtered results:

- To select more than one value from the available list, click the Multiple Selections indicator and select another value. The page will refresh, and the Report Criteria will indicate that this selection is included:
- You can continue to add criteria based on other field values as needed. For example, let's add additional filtering for the assigned Shop. In the Criteria field list, scroll until you find the [WO] Shop field and click on it
- Your organization's "Shops" will now appear in the list. The indicator for "Multiple Selections" remains on, allowing for multiple shops to be selected. Pick one or two shops from your list and note how they are added to the Report Criteria and honored in the refreshed results:
- If you decide you do not wish to filter by the indicated criteria, you can use the Clear or Clear All options beneath the Criteria list. If you wish to remove all "criteria" defined in the Smart Criteria Pane, you could use the Clear All option. For our example, click Clear to remove the latest criteria added. The criteria for Shop will be removed:
- For demonstration purposes, select a date field from the field list (Complete or Target Date). Notice how the available options switch to logical date groupings. This is an expedient method to view work orders from different time periods:
The defined Smart Criteria remains in effect while you toggle back and forth to Report Setup (if needed). However, once you exit (close) the report, this dynamic filtering is not saved. It is only used during the current "viewing/run" of the report.
Tip: It should be noted that most MC Reports are set to have Smart Criteria available, but hidden, in the Report Preview window. That is, although the Smart Criteria pane does not show by default, a "Show/Expand" Control appears in the far left of the Report Preview window. Clicking on this control will bring up the Smart Criteria Pane for your use. To set Smart Criteria to show by default in order to keep it displayed as you toggle between the Report Preview and Report Setup windows, ensure the Default State is set to Shown as described above:
"On the Fly" Report Criteria
Let's continue using the same report to illustrate the benefits of "On the Fly" criteria. Though there are many criteria fields on this report, we will only give end users the ability to modify two of these fields from within the Report itself using the "On the Fly" feature.
- Access the Report Setup by clicking the Setup button on the Report Preview window:

- In the Report Setup, select the Criteria tab:

- In this tab, every criteria field predefined for this report will display. To include fields in the Report Preview window, simply click the checkbox next to the desired field(s). In this example, we will make it possible for technicians to modify the following two criteria: the Work Order Complete date, and the Shop ID:
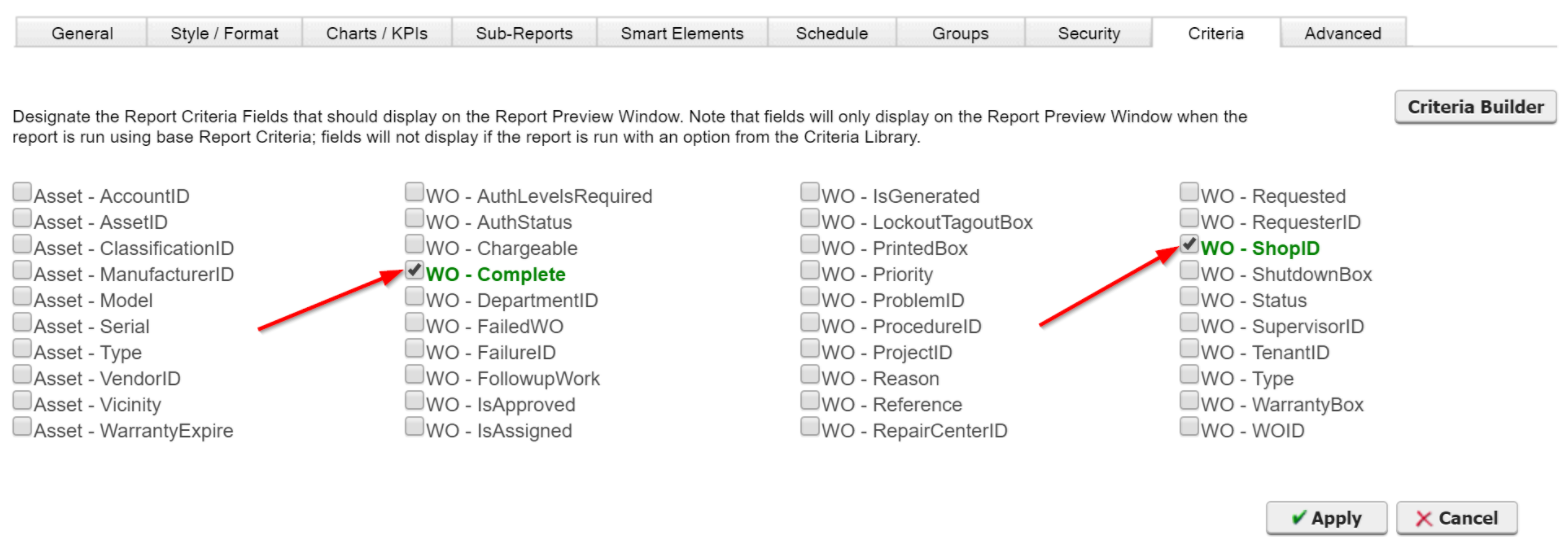
- After clicking Apply, the Report Preview will open with these two criteria fields displayed at the top:
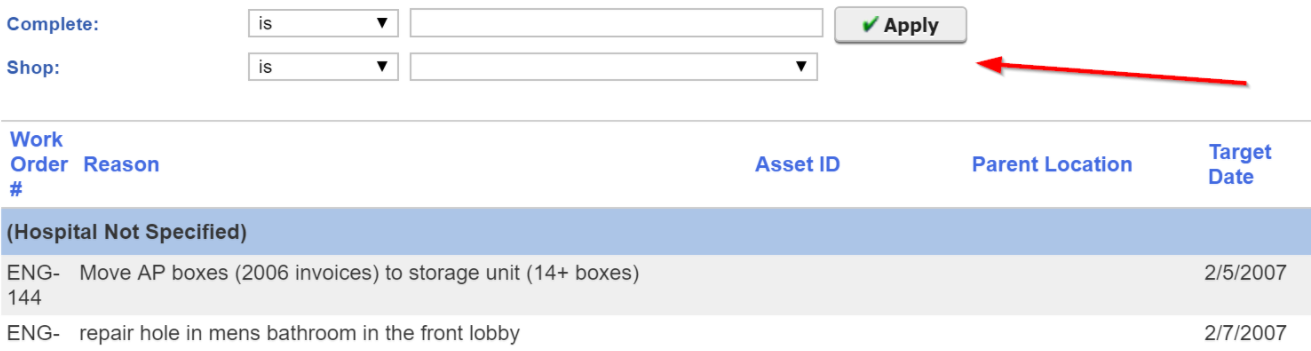
- End users can now modify these two criteria fields, click Apply, and see the desired data on the Report.
As mentioned above, the benefit of this feature is that, by restricting access to modify report criteria to a particular Access Group, we could still allow members of that Access Group to change these two criteria fields from within the report as needed.
Lesson 7: Email Report
Report content displayed in the Report Preview window can be easily emailed to selected recipients. To email a displayed report:
- Click the Email button in the Report Preview toolbar:

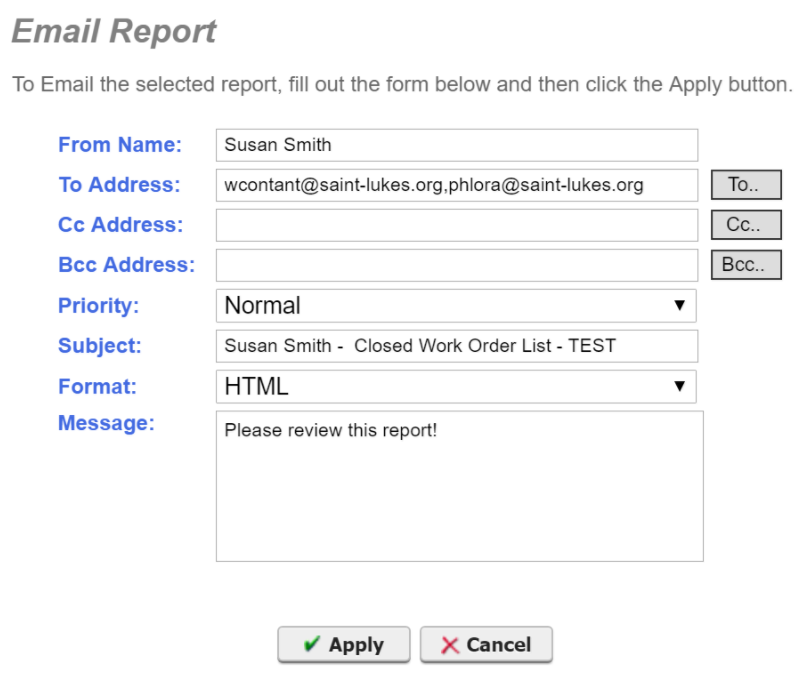
- The Email Report dialog will display:
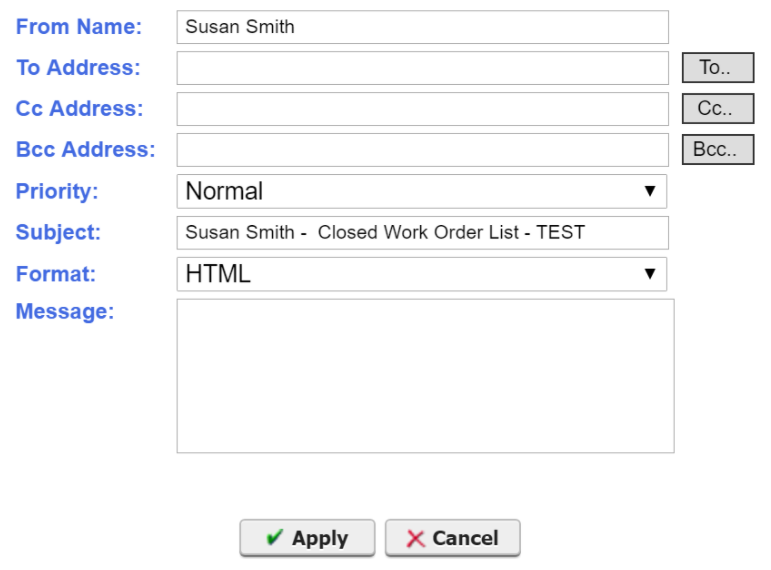
- The name of the logged in user will display in the From Name prompt. It should be noted, however, that the system determines the Email From/Name values based on the System Preference defined. If values are specified for this preference, this is what will display to the recipient. If no values are displayed, the logged in user will show. If your system is set to show the logged in user, you can modify the From Name as desired.
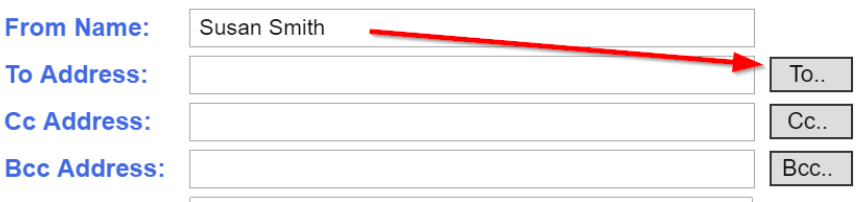
- Recipients are specified in the To Address prompt. You can manually enter any email address directly into this prompt, with multiple addresses separated by a comma. However, if you are sending to an individual maintained in your MC System, you can quickly retrieve their correct address. To do so, click the To: button which will open the Select Recipients dialog:
- Use the available prompt to indicate that you wish to locate an Employee, Contractor or Requester:
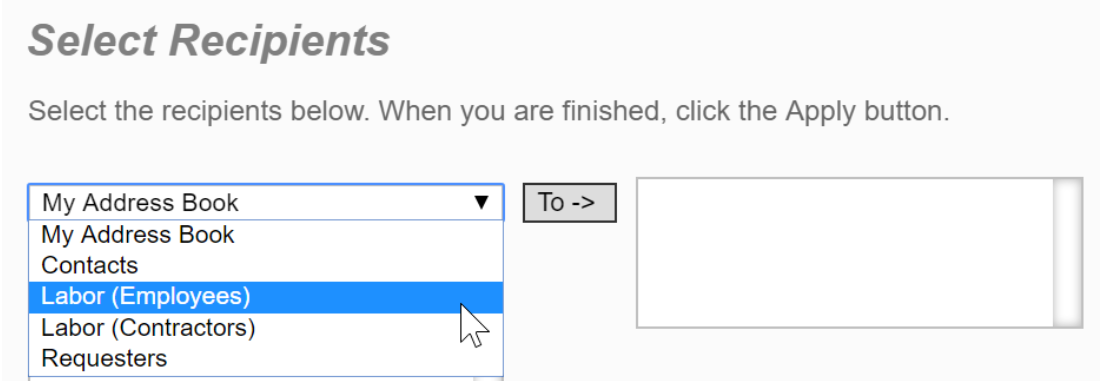
- Once the value is selected (e.g., Labor [Employees]), a list of records corresponding to that selection is displayed. Records that appear disabled (greyed out) do not have email addresses stored in their record.
- Select the desired recipient and click the To-> or Cc-> button to indicate that you want them included in the respective address line of the email:
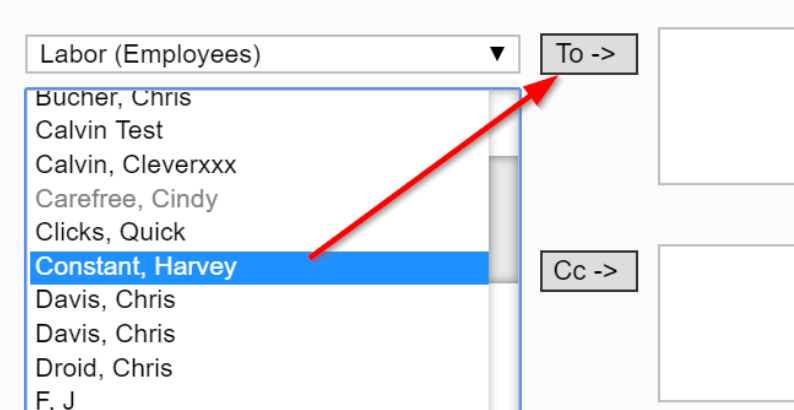
- Select any additional recipients. Click Apply when done.
- The Email Report dialog will display, listing the email addresses of the intended recipients. If multiple recipients were specified, the addresses will be separated with a comma.
- The email Subject will list the report name. You can modify this as desired. In addition, you can specify a message to appear in the body of the email, above the displayed report contents:
- Click Apply when you are finished. You will receive a message indicating that the report was sent to the intended recipients.
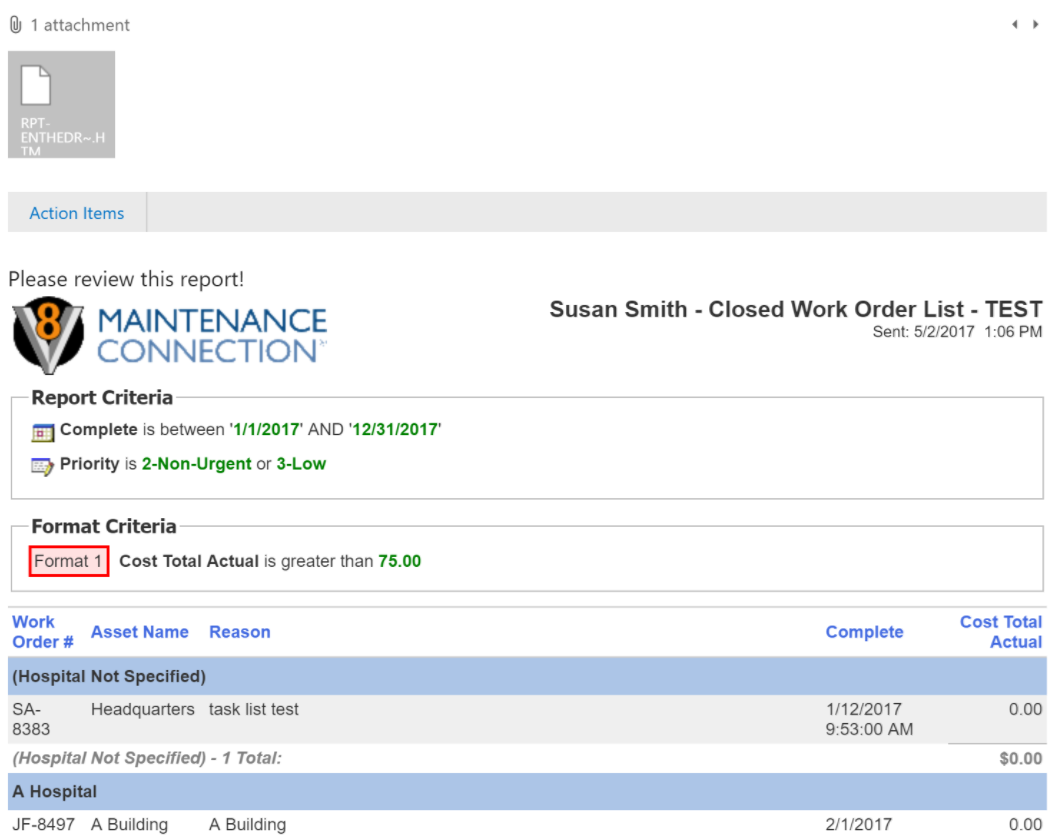
The email received by recipients will embed the report into the email body. In addition, the report will be shown as an attachment, allowing the recipient to open it in a browser window:
Lesson 8: Schedule Reports
Reports in Maintenance Connection can also be scheduled for automatic distribution (via email) to specified individuals.
Note: To use the report scheduling feature the Agent Service must be enabled at your organization. If scheduled reports do not work for you, contact Maintenance Connection Support or your System Administrator to ensure that the Agent Service was purchased and enabled at your organization.
- If you are continuing from a previous lesson, return to Report Setup. Alternatively, access Report Setup for any Work Order Report that can be modified for training purposes:

- From the Report Setup window, select the Schedule tab. If the tab is not displayed, you are likely a member of an Access Group without permission to access this feature. You must contact your System Administrator for assistance:

- On the the default Email sub-tab, turn the Email Schedule On. Additional prompts will display allowing you to specify the recipients and time to send.
- In the Frequency prompt, specify how often you wish the report to be sent. For example, to have it sent once a week, you would enter Every 1 Week(s). In the Begin on prompt, specify the date and time the report should begin sending. If you wanted the report to go out each Monday, you could pick the next available Monday from the dropdown, and specify the desired time of day:

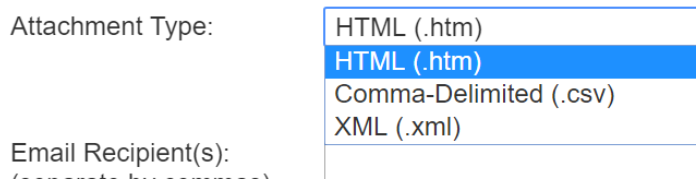
- In the Attachment Type prompt, specify the type of attachment that should be included with the email. For most reports, the HTML option is preferable. The XML and CSV options are most often used when reports are to be opened in Excel or another software program:
- The Do not send if report returns no records indicator is an especially helpful feature. For most scheduled reports, you only want the report sent out if data requires attention (e.g., overdue work orders, unapproved purchase orders, employees with expiring certifications, etc.). Set this indicator on if you want to limit report distribution to happen only when records match your defined report criteria:

- In the Email Recipient(s) area, you can manually enter the email address of any individual to receive the report, with multiple addresses separated by a comma. Or, as used in Lesson 7, you can click the Add button to access the Select Recipients dialog:

- On the upper right of the page, you can specify the name and email address that should be listed as the sender on the email accompanying the scheduled report. It is always preferable to enter a recognizable name to reduce the risk of the recipient's email system interpreting the email as spam:

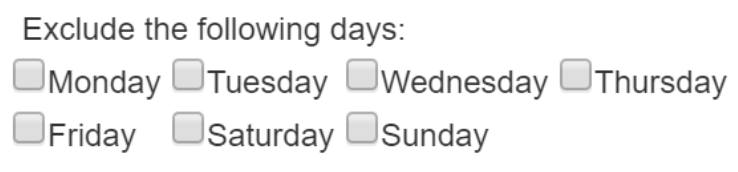
- On the lower right, you can designate if particular days of the week should be excluded from distribution. For example, on a report scheduled for daily distribution, you may want to exclude Saturdays and Sundays. This setting is not necessary for the weekly schedule in our example:
- To save the changes made, click the Apply button. Your report will be emailed when the next scheduled date and time occur
Note: It is important that email addresses are accurately entered as the report will not distribute if any of the email addresses are invalid.
Lesson 9: Export Reports
Maintenance Connection reports can be exported to a variety of formats. Custom formatted output, such as the Work Order Statement, can only be exported to a PDF or HTML file. Reports formatted in a more typical column and row fashion, however, can also be exported to a .CSV or .XML format. Once exported and saved to your desktop (or a server), the report output can be opened using any application that supports the specified type.
Let's export this report to both a .CSV format and open it in Excel, and then open it in a PDF.
Note: Some customers may have difficulty exporting to a PDF, due to local setup issues or unique report configuration. If you encounter problems, we recommended that you use the HTML option instead.
- From the Report List select the report you wish to modify, and then select the Run Report button at the bottom of the screen:

- Click on the Export button on the Report Preview toolbar:

- The Export dialog will display, showing the available export options:
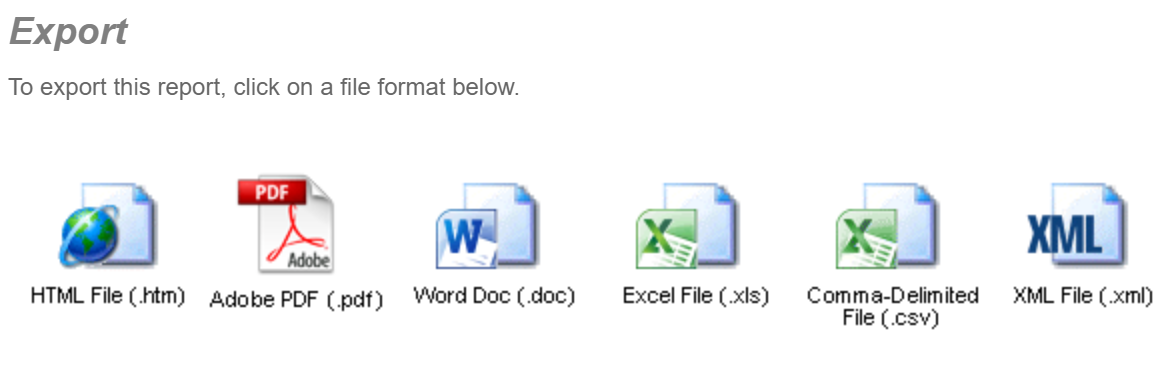
- Click on the Comma-Delimited (.csv) option.
- Your operating system will prompt you to indicate if you wish to Open or Save the file. Click Save:
- Choose a location to save your file and enter a name for the file
- Click Save when you have entered your information
- Depending on your operating system, you should receive a confirmation message, giving you the opportunity to open the newly-created download file
- Click Open when prompted
- Excel will open and present the content of the report:
- The columns can be reformatted and resized using the standard Excel features.
- Once presented in Excel, you can use any of Excel's powerful features to further manipulate or perform calculations on available data.
Tip: You may note that only the basic column, row and header information is exported when the .CSV format is used (no report title, groupings, charts, etc.). This allows for optimum manipulation of the data from within Excel. If you prefer to have additional data included in your export, you can export to an HTML format, save the file, and then proceed to open the saved file directly from Excel. Additional information, such as groupings and page headers, will be included.
- Close the Excel window to return to the MC Export dialog.
- With the Export dialog displayed, click on PDF:
- Once exported to PDF, you can use available options to Save a copy of the file for future use:
For complete reference information on the Maintenance Connection Reporter, refer to the Online Reporter Guide. The following additional Reporter Tutorials are also available in our Knowledge Base:
- Reporter Tutorial - Basics: Overview, Copy Report, Report Groups, Report Preview Window, Report Criteria, Field Selection, Sorting/Grouping, and Charting
- Reporter Tutorial - Advanced: Custom Expressions, Modify Fixed Criteria, Editable Smart Reports, Custom Group Headers, and Summary Reports
- Reporter Tutorial - Pivot Reports: Instructions for creating Pivot Reports, an easy to use method for presenting aggregated or summary data